Example: Taken from www.unco.edu

In Fireworks
Step 1: Make a button folder where you can save your images for your buttons on the navigation bar. In the buttons folder there should be folders for every button.
Step 2: Open Fireworks and click File and click New. Make your width and height 1000 px each so you have a big stage to work with.
Step 3: From your tools panel select the vector rectangle and draw a rectangle on the screen. (Feel free to customize your square with fill color, stroke color, texture, filters, etc) Make the rectangle width 170 and the height 50.
Step 4: Fit to canvas
Step 5: Save as generic-button and put it in the folder you have your buttons
Step 6: Open generic-button if you closed it and now we will add text to the button to specify it as button 1. Create a new layer and make sure it is above your first layer. In the new layer go to the tools panel for the vector text tool and use it to create a text box the button. (you will have to manually place the text in the button to align it.)
Step 7: Save as Button 1 in your sub folder part of your buttons folder. Repeat for buttons 2-5
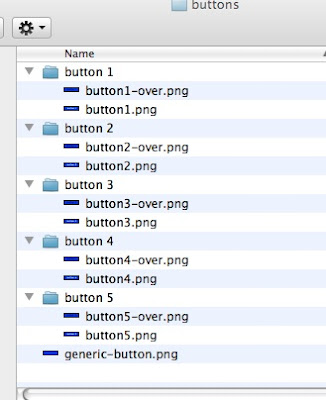
*Once done with Steps 1-7 you should have a buttons folder with 5 folders inside it. The five folders should have one button each.
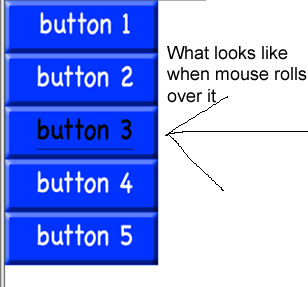
Step 8: Mouse rollover images. Next we will create rollover images in fireworks so that when a mouse goes over one of the buttons in the navigation bar the button will change images. Open button1 and change the text color to something that contrasts well. You can also add an underline if you so choose. After you make the changes to the button you have to save it as button1-over and save it in the same folder as button1. Repeat for buttons 2-5.
*In your buttons folder it should look like the following

Now creating your Navigation Bar in Dreamweaver
Step 1: Open Dreamweaver and either create a new html page or open your HTML page that you would like to add your navigation bar to. Once your on the page go to the insert tab and click image objects then navigation bar.
Step 2: In the menu it brings up, name your first element button1. Next, browse for the up image and you should get it from your button 1 subfolder in your buttons folder. For the over image browse for your button1-over. Leave down and over while down blank. Alternate Text will bring up a text box when you rest the mouse over the button (not required) Set the link to your page of the button. *Important choose whether you want navigation bar to be horizontal or vertical.
Step 3: Above the Nav Bar Elements section click the plus sign and repeat Step 2 for buttons 2-5.
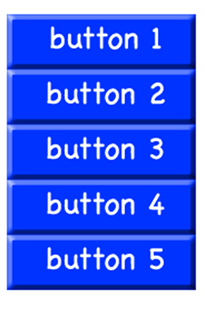
Final Product with mouse not rolling over.

Final Product with mouse rollover


No comments:
Post a Comment